PEAL – Bell Posts: The First Technical Drawing
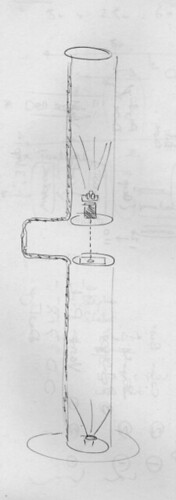
We need to build eight “towers”, seven feet or so in height, with some kind of cut-out at a natural hand-height (we probably need to work out what that is, for a mixed visitor base of children and adults). In this version, the top part of the tower is held on a rod which has been extruded backwards, in order to allow people to insert their hands without hitting the rod. (There may be much better ways of doing this – we’re open to suggestion.) We’ve also not been at all specific about the diameter of the tubing: with this kind of extrusion – or some other – the tube doesn’t have to have a large diameter, although it needs to be wide enough to hold the electronics, and for the lighting effects to work. For practical reasons it also makes sense that each tower can be disassembled at the centre point, for ease of transport.
Towards the centre of the device, spanning the gap, we have the laser assembly (upper, pointing downwards) and the photodiode (lower, facing upwards). Unlike my earlier design ideas, the laser doesn’t run the entire length of the device – unless we can guarantee beam visibility along the full length, there isn’t much point – and having laser and sensor this close should hopefully minimise issues of alignment and vibration. We do want the beam to be visible on people’s hands – if we use the Odic 70mW units that is definitely going to happen – and I guess there are options for some kind of cover on the photodiode and/or the top of the lower tubing section to do something interesting
with the laser light when the beam is “open”. (We might also need to put some kind of weak diffusion cover over the LED clusters.)
This is an example of a piece we’ve been thinking about for visual design:
Herwig Weiser: Death before Disko
The machinery is all pretty much exposed, as opposed to everything being behind milky, 1970’s opacity. One task is to agree on some kind of material for the tubes which works well with the proposed lighting.
Ah, the lighting: in our current design only the top half of the device uses programmable RGB lighting (I’ve sketched an LED cluster sitting on top of the laser, pointing upwards). We’ve not decided what happens at the very top of the tube: whether there is some kind of covering, and/or some kind of gobo which scatters the light upwards. (We need to do a proper site visit to see how that will work in the space.) In the lower part of the tube I’ve indicated some kind of passive, neutral fill lighting, non-switchable. (I have in my mind some kind of deep blue/UV colouring here, but am open to persuasion.)
The digital stuff: the trade-off decision is whether to go for the BlinkM I2C units, at the extra cost, in order to cut down on required Arduino channels and discrete cables for all the RGB feeds. (As in Cyfnod, we also want to be able to gate the lasers.) My feeling is that we should go I2C for reasons of construction time and simplicity, although we then have the task of making sure the I2C actually works. (We need to think about how to run the I2C cables around the towers, especially as the MaxM units are half way up each tower.) We’re not totally opposed to going the fully analogue/PWM route for RGB, but there would have to be a clear benefit, especially as that approach would require multiple communicating boards. (More thoughts at http://blog.monomatic.net/?p=106.)